Creating your Catalog
Before you can start selling, you need to create a product catalog. The catalog is a core part of your operations, allowing items to be clearly displayed and quickly selected during sales. Follow the steps below to set up categories, subcategories, and items in the Fortis POS Platform.
Steps
Sign in to the Fortis POS Platform at https://my.fortis.world/auth/login.
From the top menu, click Catalog (1) to open the Catalog main page.
-
Review the Catalog layout:
Category (2): Create parent categories
Parent categories list (3): Displays created categories
Add item (4): Add items and variations
Search by name (5) or filter by category (6)
-
Results area (7): Displays items
Click Category (2) to create a parent category. Set the Status (1) to Active or Hidden.
Review the Localization option (2). Currently, English is supported.
Enter the category Name (3). The Parent field (4) remains empty for the first category.
-
Optionally add a Description (5) and upload an image (6) in PNG or JPG format (up to 5MB), then click Add.
To add a subcategory, select the parent category (1) you created and click Category (2) again.
Choose the Parent category, enter a Name [for example, Sub-category2] (3), and click Add.
-
Repeat this step to create additional subcategories as needed. You can select any parent or subcategory and click Add item to add products.
In the Create Item window, enter the Name and Price, and add a product image (1).
-
Select the Status, Category, VAT, and Measure (2). Available measures include piece (AED), kilogram, liter, hour, day, and others.
-
Enter the Description, and optionally add a Barcode and SKU (3).
Add item variations by clicking Add (4), then enter the Name, Price, Barcode, and SKU for each variation.
Click Save to save the item, or Save & Create New to save and immediately create another item.
Important: Entering an invalid barcode will cause an error. In this case, leave the barcode field empty or enter a valid barcode.
Once completed, your catalog will include parent categories, subcategories, and item variations, ready for use during sales.
Applying Discounts
Making a discount is the most common way of attracting customers and managing sales. Fortis POS App provides you a bunch of simple and flexible tools for managing discounts on the go.
Sale Discount
A sale discount is applied to the entire cart and adjusts the total amount.
Steps
Log in to the Fortis POS App.
Go to Sales.
Tap New Sale and proceed to To Cart, or open an existing sale from the list.
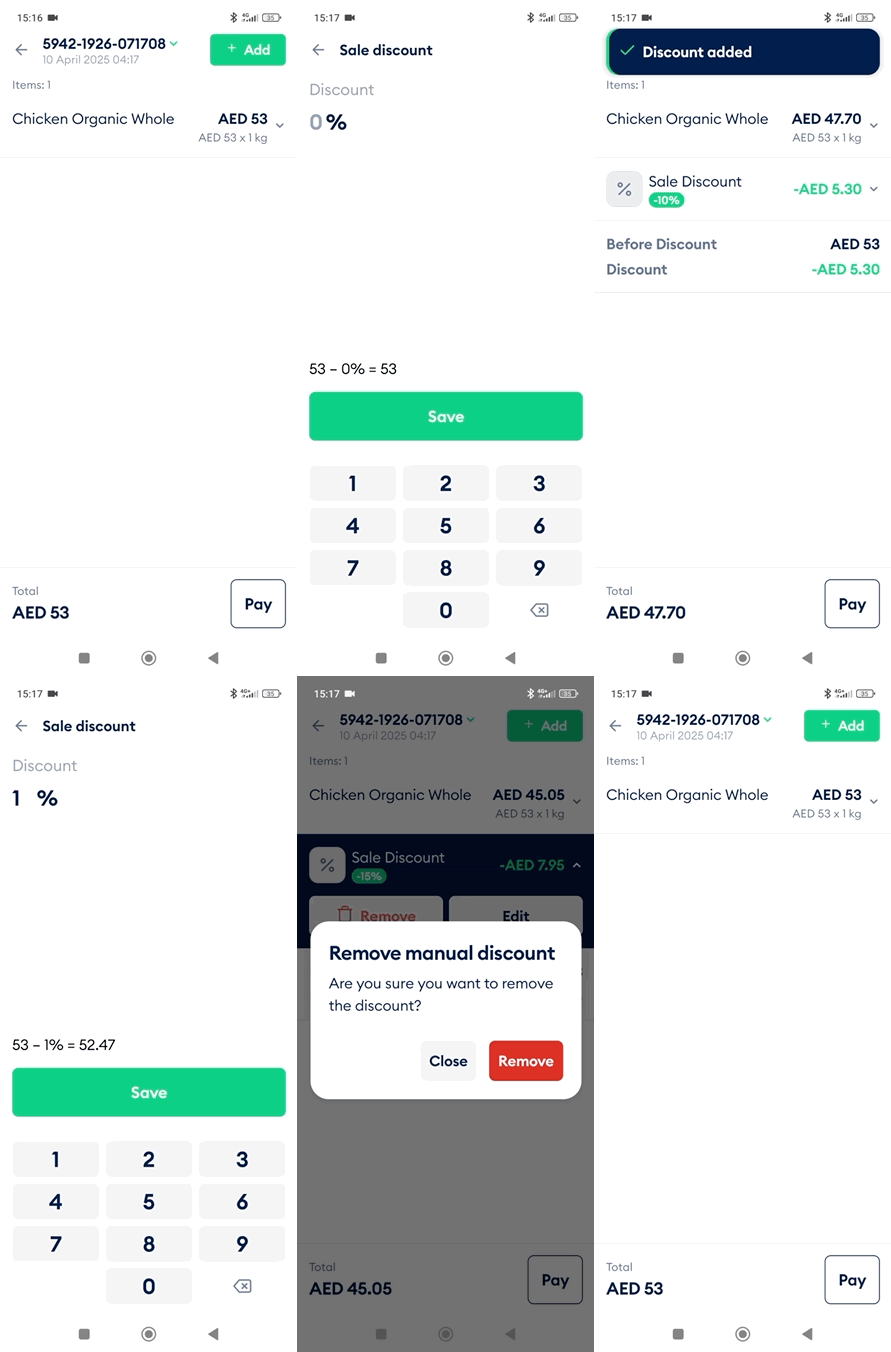
In the Cart screen, tap Add and select Discount.
Enter the discount percentage and tap Save.
The discount appears at the top of the item list. Tap it to Edit the discount, or tap the red bin and select Remove to delete it.
Item Discount
An item discount applies only to a specific item in the cart and adjusts that item’s price.
Steps
Log in to the Fortis POS App.
Go to Sales.
Tap New Sale and proceed to To Cart, or open an existing sale from the list.
In the Cart screen, tap the item you want to discount.
Tap the three-dot menu and select Item discount.
Enter the discount as a percentage, or select Amount and enter a fixed discount in AED. Tap Save.
To modify the discount, tap the item again and open the Item Discount screen.
To remove the discount, enter 0% or AED 0 and tap Save.